.gif) |
|
|
|
|
|
|

|
|
When you think of business presentations,
Macromedia Flash MX may not be the first product
that comes to mind. Most people view Macromedia
Flash MX as a product for creating web-based
animations.
But, there has been tremendous improvements
made to Macromedia Flash MX in the last few
releases, especially in the areas of application
development. It is now possible to create
sophisticated user interface screens almost
completely in code. This opens up a huge potential
for Macromedia Flash MX to be used as the
front-end visual layer for many web-based business
applications.
| | |
|
Obviously, anyone familiar with the Macromedia Flash MX
authoring tool can "manually" create a business presentation
application, but the goal is to create a generic Macromedia
Flash MX application that can be used by other "back-end"
programs for delivering any business presentation.
The back-end program can be an in-house application or a
simple web-based HTML page, which allows anyone to fill out a
series of forms in order to create a business presentation.
So how will the Macromedia Flash MX application communicate
with the back-end program? One option is to use XML. XML has
become an industry standard for delivering data to
applications. Macromedia Flash MX has excellent programming
support for XML, so it is an obvious choice.
The content for your business presentations can be
encapsulated in an XML file. Your Macromedia Flash MX
application can then read this file and deliver the
presentation. Your Macromedia Flash MX application will not
care how the XML file was created, only that it is there and
it follows some basic formatting rules. |
|
| |
|
|
Source
files |
|
|
|
|
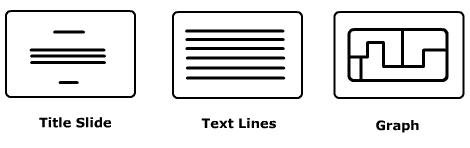
Definition of a business presentation
At its
core, a business presentation is a series of slides. The
slides highlight the presenter's key points and clarify
concepts through text and images. Common slide formats
include:
|
|
|
A "starting"
slide with the title of the presentation. |
|
|
A list of text
lines. |
|
|
A graph or an
image. | |
| |
|
| Figure1:
Common slide formats. |
| |
| A presentation slide
can have other, more complex, formats; but in our case, we
want the program to support these basic types. |
|
The XML File Format
Let's take a quick look
at the XML file format. The XML presentation file is divided
into a number of slides.
|
<Presentation>
   <slide type="0">
   </slide>
   <slide type="1">
   </slide>
   <slide type="1">
   </slide>
   <slide type="1">
   </slide>
</Presentation>
|
| Notice how each slide
also has a type. The type "0" slide is a "Starting" slide:
|
<slide type="0">
  <title> </title>
  <description> </description>
  <owner> </owner>
  <background> </background>
</slide>
|
It holds the title,
the description, and the name of the presenter. It also lets
us set the background image of the presentation slide.
Supported formats are JPEG and SWF.
The type "1" slide just holds a list of text lines:
|
<slide type="1">
  <line> </line>
  <line> </line>
  <line> </line>
  <line> </line>
</slide>
|
| Finally, the type "2"
slide holds a JPEG or SWF image: |
<slide type="2">
  <picture> </picture>
</slide>
|
|
Design Approach
We've already seen a working
copy of the Macromedia Flash MX business presentation. It's a
Macromedia Flash MX application which is driven by an XML
file.
The design approach is to create a series of empty or
skeleton front-end slides, which are then "populated" by the
"back-end" XML data. The front-end visuals will be created in
Macromedia Flash MX using the standard authoring tools.
ActionScript will be used to load the XML file and to populate
the slides.
For example, to design a slide containing a list of text
lines, we can use the "Text Tool" to add a series of empty
text fields on the stage. These text fields can then be
populated at "run-time" via ActionScript commands.
In Macromedia Flash MX, each element on the stage can be
accessed directly through ActionScriptas long as the element
has been given an instance name. The instance name is set in
the Properties Inspector whenever an element is added to stage
or a movie clip.
So, to set the content for a text field on stagewith an
instance name of "line1"we would do the following: |
line1.text = "This is a line of text to be written into text field 1";
|
| You can see how this
method can be used to dynamically populate the fields.
This design strategy is actually quiet common for building
Macromedia Flash MX applications that present dynamic data.
The back-end data can come from an XML file, a text file, or a
application server program such as ColdFusion or CGI, which
connects to a database. So, the design we use here can be used
in your other dynamic Macromedia Flash MX projects.
However, the Macromedia Flash MX business presentation
program does have a few additional requirements which are
unique to our situation. For example, when we are creating the
skeleton visuals for a slide containing a list of text items,
where do we position the place-holder text fields? The actual
text content will be coming from the XML file at run-time. So
at design time, we will not know how big each text field
should be, or where they should be positioned.
As it turns out, this is not a difficult problem to solve.
Once again, ActionScript comes to the rescue. Using
ActionScript, we can change the position of each text field on
stage at run time using its _x and _y properties: |
line1._x = 200; // move the text field to location: 200,125
line1._y = 125;
|
| Other TextField
properties let us get or set its current size: |
height = line1.textHeight; // Height of the text field
width = line1.textWidth; // Width of the text field
|
| Or make it disappear
from the stage: |
line1._visible= false;
|
| So through ActionScript
commands, we can adjust the size, position and the visibility
of each individual text field dynamically at run-time.
With this knowledge, we can create generic front-end
visuals with default positions without worrying too much about
the details. Once we have the actual data from the XML file,
we can use ActionScript to adjust the size and position of
individual items to match our needs. We'll see how this is
programmed in the next section.
Another design decision is in regards to the actual slides.
It's important to point out that we are NOT going to create a
visual for each slide in the XML file. Instead we will create
a visual for each "type" of slide. For example we will create
a visual to support all slides that require a list of text
lines. Another for all slides that require an image.
So, how many visuals do we need? As we mentioned earlier,
we want to handle 3 types of slides. One which supports a list
of text items, another which supports a single image or a
graph, and finally, another which supports the title or
starting page.
The design calls for the creation of 3 front-end visual
skeletons. These visuals will lie on top of one another on the
stage but will initially be invisible (visible=false). When a
slide is to be shown, its correct type is first identified
then it is populated. It is then made visible.
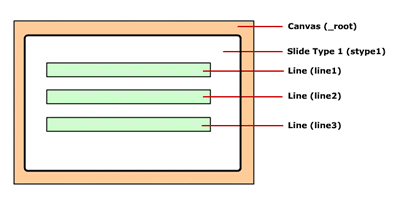
To simplify our work, we make each slide type into a movie
clip. The required elements such as the text fields will then
be added to the appropriate movie clip. We need to make sure
we give each element an instance name. We can then put all the
movie clips on the stage, making sure that they too have
instance names. |
|
| Figure
2: Movie clips with their instance names. (Click on
the above image for a full-size version of the
illustration.) |
| |
stype1._visible= true; // make slide type 1 visible
stype1._visible = false;// hide slide type 1
|
| The individual items
within a slide can be accessed through the slide's instance
name: |
stype1.line1._x= newX; // set x,y location of line 1 in slide type 1
stype1.line1._y= newY;
|
| The slide types
themselves are placed on stage in the main timeline. So, the
correct way to access them is through the full path starting
from the "root": |
_root.stype1.line1._y= newX; // The full path for accessing an item
|
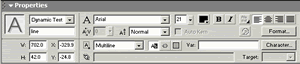
| There are a few more
details you need to be aware of when you create text fields
for the visuals. Text fields need to be set as Dynamic and
Multiline. You also need to embed the font outlines via the
"Character" button. Of course, as we mentioned earlier, you
also need to give each text field an instance name. |
|
| Figure
3: Text field properties. (Click on the above image
to see a full-size version of the illustration.) |
| |
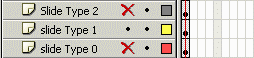
| Refer to the file Presentation.fla
within the download linked
above to see how the 3 slide types were created.
Notice how we have placed each slide type in a separate
layer. This lets us easily hide and show individual
slide on the stage when we are working with them. |
|
| Figure 4:
Slide layers. |
| |
| You are done with the
visual front-end portion. It's now time to add the
ActionScript commands. |
Adding
Code
You've laid the ground work for the presentation.
The slide types are ready. The individual elements are
accessible and you are ready to add the code.
Obviously, something needs to drive the program. The
presentation needs navigational elements. You need the ability
to go to the next slide, back up one slide and optionally go
back to the beginning of the presentation.
This should be easy. You simply add buttons to the
presentation and assign actions to them. |
on (release) { _root.gotoNextSlide(); }
|
| Since the program is
driven through ActionScript commands and not timelines, the
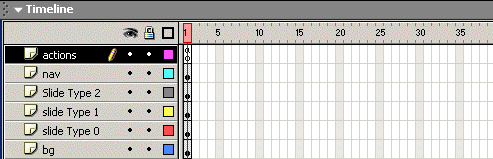
main timeline looks fairly sparse. You only have 6 layers.
Three are used for the slide types, one for the background,
one for the navigation buttons and finally, one for the
ActionScript commands. Everything happens in the first
frame. |
| |
|
| Figure
5: Timeline layers in Presentation.fla. |
| |
| It is quite typical for
code-driven Macromedia Flash MX programs, such as this one, to
have all its ActionScript commands in a single frametypically
the first frame. So, all of the code (except the few actions
in the navigation buttons) will be in this one frame. Take a
quick look at the code. |
| |
VSPACE = 30;
MAXLINES= 7;

// Load XML presentation file and then call: startPresentation()
pres_xml = new XML();
pres_xml.load("presentation.xml");
pres_xml.ignoreWhite = true;
pres_xml.onLoad = startPresentation;
|
At the top, you define
a couple of global variables, or constants. These will be used
throughout the program. One represents the vertical spacing
between lines (VSPACE) and
the other is the maximum number of lines per slide. Remember
Macromedia Flash MX will execute ActionScript commands in a
frame from top to bottom. However functions will be executed
only when they are called. You'll see the functions in the
next steps.
The code also opens the XML file "presentation.xml" and
then calls the function startPresentation(). This function gets
the first slide (rootNode.firstChild) and then calls
showSlide() to display it.
Next are the functions that populate and show each slide.
They are also driven via calls made from the navigation
buttons. For example to show the next slide ( gotoNextSlide() ) you need to:
|
|
1 |
Parse the "slide"
node in the XML document to determine the slide type:
showSlide(). |
|
2 |
Hide all slide
types: hideSlides().
|
|
3 |
Go to the slide
type to be displayed: showSlideTypeX(). |
|
4 |
Read the
individual elements (such as text lists) from the XML
nodes. |
|
5 |
Populate the new
slide type. |
|
6 |
Adjust the
position and size of each text line in slide based on
the content: PositionLine(). |
|
7 |
Make the new
slide type visible: _root.stypeX._visible = true;
| |
| |
The functions
goToPreviousSlide() and
goToFirstSlide() follow a
similar format.
You're done with the code. In fact, you're are done with
the program. Take a few minutes to go over ActionScript
commands and trace the execution until you are familiar with
the design. |
Possible
enhancements
The Macromedia Flash MX presentation
program has been kept simple so it can be easily understood.
However, there are several enhancements that can be made to
the program to make it more useful. Here are some ideas:
Front-end program
Although users can manually
create the XML files needed for the Macromedia Flash MX
presentations, the program becomes far more useful when there
is a user-friendly, front-end program which creates the XML
files automatically. An HTML-based presentation program
(written in ColdFusion, Perl, PHP, or some other server-side
technology) can be written for this purpose.
More slide formats
You can add more slide
formats. For example, you can have a slide format that allows
for a combination of text lines and an image.
More formatting options
You can add many more
formatting options, especially for the text lines in our
slides. For example an optional attribute on the "line" tag
can allow for indenting text. <line indent="2"> can
indent the text line by two places. You can use the
_x property for setting a
line's indentation. Other formatting options (such as color,
font style, and so on) can be implemented too. Check out the
ActionScript methods and properties for the TextField object
to learn about these options. You may also want to look into
the TextFormat object. This object can be used to control the
formatting and styling of TextFields.
More backgrounds
The presentation comes with a
single sample background (bg1.swf). However you can create a
variety of backgrounds and load them via the <background> tag of the slide type
"0". Just make sure the size of your background image is
800x600 pixels and it is either an SWF file or a JPEG
file. |
| |
| -------------------------------------------------------------------------------------------------------------------------------------- |
|
About the author
Sassan Behzadi has
over 18 years of software development experience - primarily
in UNIX and Windows environments. As the co-founder and the
CTO of "Man vs Machine", he helped Fortune 500 companies
migrate their existing legacy products onto the Internet.
Sassan is fluent in C/C++, Java, Perl, PHP, JavaScript,
ActionScript and several other languages. He is currently
writing a series of on-line interactive programming courses
using Flash. The first can be viewed at "Joe Grip's
Interactive Guide to Java" (http://www.joegrip.com/). He can be reached
at sassan@joegrip.com. |
| |
| |
| |